
MIDI Inputs
In addition to Arcane being able to control other devices and software via MIDI, it is also possible for other software / hardware to control Arcane using MIDI.
For now the primary use-case for this is configuring MIDI controllers, (or other control systems such as lighting consoles) for operators to manage Arcane Desktop in live environments.
We plan on expanding the ways in which you can use MIDI inputs with Arcane, (for example to connect to live band MIDI instruments, or making it easier to create spells) but for now the focus is on operator control.
Connecting a MIDI Input
You can connect as many different MIDI input devices to arcane as you'd like:
- Go to
Settings->MIDI - Click
Add MIDI Input - Configure the input as desired, specifying:
-
The device to send MIDI messages to.
-
The appropriate profile for the given device.
It is okay to leave this as blank (or select a Generic profile), you will still be able to configure your device.
Note: The appropriate profile for your device should be selected automatically for you. If this does not happen, it's likely we don't have a profile specified.
-
A Sub-Profile for the device if shown (for example, some devices have different modes, or different ways of providing feedback)
-
Feedback settings for the device, if applicable (see below).
-
To test that you are receiving input correctly from the attached MIDI device,
you can click Monitor Messages
to open a window that displays all incoming and outgoing messages in real-time.
Interacting with the device should then display messages.
MIDI Feedback
MIDI Feedback allows Arcane to send information back to your MIDI devices for example to control LED lights, motorized faders or LCD screens.
If you Enable feedback for your device, you will then be able to configure the:
- Name of the output device to send feedback to.
- The
FPS(max frame-rate at which feedback should be sent).
Note: The appropriate output device should be selected automatically for you when you select your MIDI Input device.
The reason that we allow you to configure this separately to the input device is because the name of the output device may not always match the input device (for example with the Novation Launchpad X).
For feedback to work correctly, Arcane needs to know what messages it needs to send to the device, and as such we need to have a built-in profile created for the device. So while any MIDI device can be used as an input for arcane, MIDI Feedback is currently only supported on the following devices:
- Akai APC Mini Mk2
- BitchBoy
- Launchpad Mini (mk2)
- Midi Fighter Twister
- Midi Fighter 3D
- Launchpad X (mk3)
If there's a specific device not on this list that you'd like to use with Arcane, please reach out to us on Discord or via email.
Note: if you are seeing a device here that's not available in your list of profiles in Arcane Desktop, make sure that you have the latest version installed.
Configuring MIDI Bindings
MIDI inputs make use of the Command System, a general-purpose system for externally controlling Arcane through various methods. This means that regardless which method you choose to control arcane, you will have the same set of features and behavior.
For now, you will need to specify the exact command you want to bind with each MIDI control, but in the future we plan to introduce UI to make configuration easier. We have prioritized getting commands working first to lay a solid foundation, and allow for users to have as much flexibility as possible.
Note: When configuring a binding, you will be able to click
Open Command Referenceto open a new window with a detailed list of commands available in the version of Arcane that you are using. No internet connection is required to access this command reference.
In the Monitor Messages window,
as your MIDI input sends messages,
you will be able to see how each message is interpreted by Arcane,
and if there are any issues with the binding.
We recommend you keep this window open while configuring your MIDI bindings.
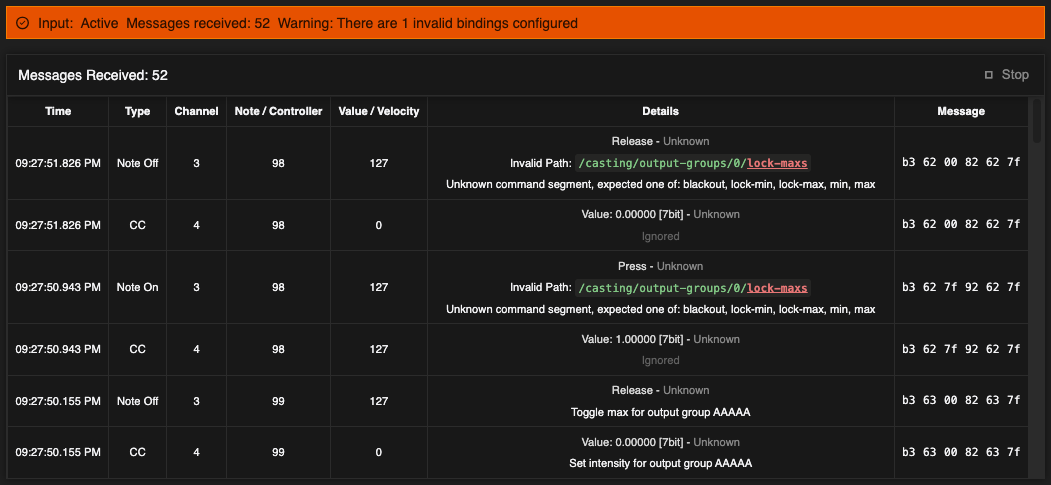
Screenshot of the MIDI monitor messages window showing incoming MIDI messages, matched with specific bindings
Adding a new binding
- Make sure that your MIDI device is not sending any messages (e.g. nothing is interacting with a control of the device).
- Click
Learn new binding. - Interact with the control on your MIDI device that you want to bind.
- Enter the command that you want to run when this control is interacted with.
When a command is correctly specified, you will see a message that confirms this and describes what the command does:
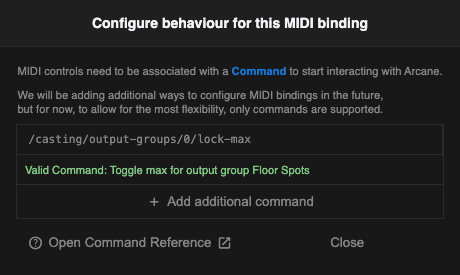
Screenshot of a valid command with message describing what the command does
Invalid commands will have the problematic section highlighted, and an error message saying what the issue is:
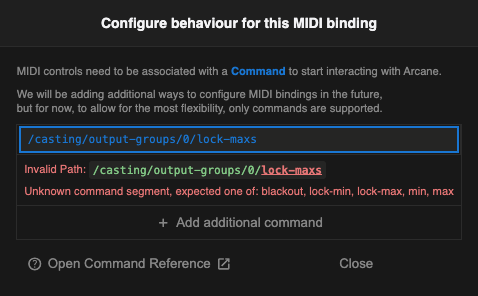
Screenshot of an invalid command with error message detailing the issue
Editing a Binding
You can open the dialog box to allow for configuring a binding by either:
-
Clicking the settings
Edit existing bindingbutton on the row you want to edit. -
Clicking
Edit existing bindingabove the binding table, and then interacting with the control you want to edit the command(s) for.
Duplicating a Binding
You can duplicate a binding by either:
-
Clicking the content_copy
Duplicate bindingbutton on the row you want to copy, and then interacting with the control you want to copy the command(s) to. -
Clicking
Duplicate bindingabove the binding table, and then:- Interact with the control you want to copy the command(s) from.
- Interact with the control you want to copy the command(s) to.
Deleting a binding
You can delete a binding by either:
-
Clicking the delete
Delete bindingbutton on the row you want to remove.. -
Clicking
Delete bindingabove the binding table, and then interact with the control you want to delete the binding for.
Handling invalid commands
When you have bindings with invalid commands configured, a warning will be displayed at the top of the window and in the network interface. On the settings page you will be able to see which commands have issues:
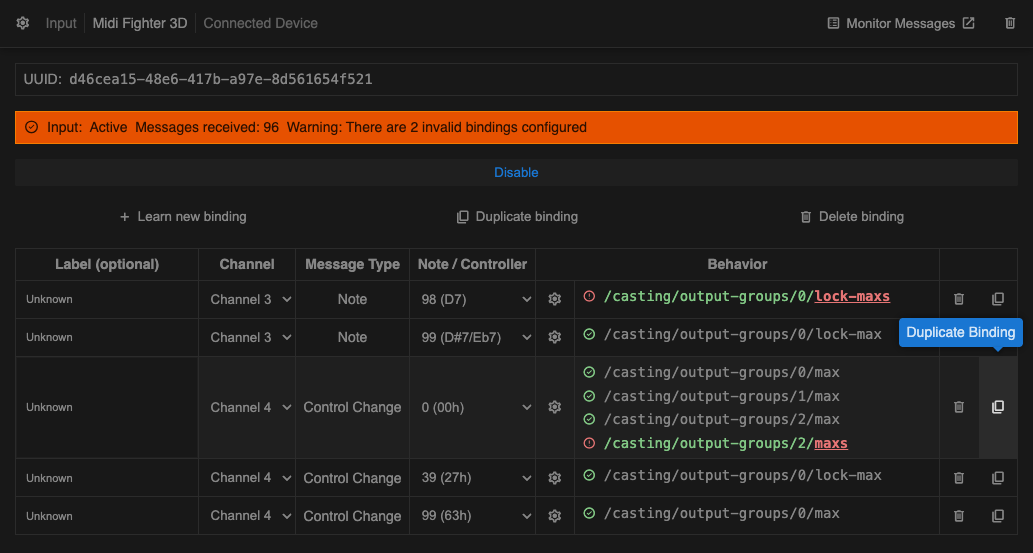
Screenshot of multiple bindings configured, with invalid commands highlighted
To resolve an issue with a binding, click the settings button for it, correct the command, and then close the dialog.
Bindings with multiple commands
It's possible to bind multiple commands to a single MIDI control, allowing you to control multiple parts of Arcane together.
To add additional commands,
click the settings button for the relevant control
(or click Learn new binding and
interact with a control),
and then click Add additional command
for each command you want to add.
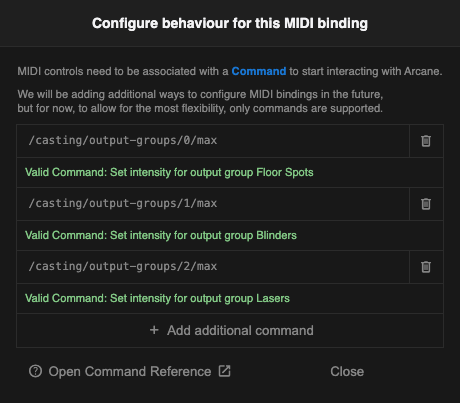
Screenshot of a single MIDI control with multiple commands configured
When you do this, if MIDI feedback is supported, the feedback from the first "active" command in the list will be sent to the device.
For example, if the first command is empty / inactive, and the second command is active, the feedback for the second command will be sent to the device.